Today@Dal
» Go to news mainOffice 365: Your questions answered
As the rollout of Dal's new email and calendar system moves along, we'll be regularly sharing answers to some of the most common questions our team is hearing from the Dal community.
For more, visit the or ask your own questions at our community help website, .
Iтm a student т when will I be able to use my Office 365 email account?
Email accounts for students will be activated during August 19th through August 28th.Ь§ The full timeline can be found on the .
How do I add my Office 365 email account to my iPad/iPhone?
The instructions below are found on to add your email account to your iPad/iPhoneтs basic email. Also, the Apple App Store offers a free app called OWA for iPad (or iPhone) that offers more features.Ь§ Learn more about the app .
1. Choose settings.
2. Select Mail, Contacts, Calendars.
3. Select Add Account.
4. Select Microsoft Exchange.
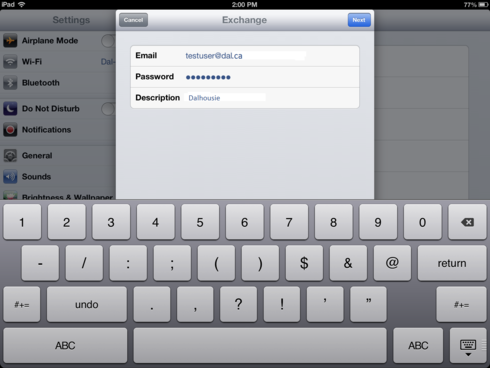
5. Enter your email (netid@dal.ca) and password (netid password) and description (аТМгЦТСљКЯВЪПЊНБжБВЅ).

6. Select next.
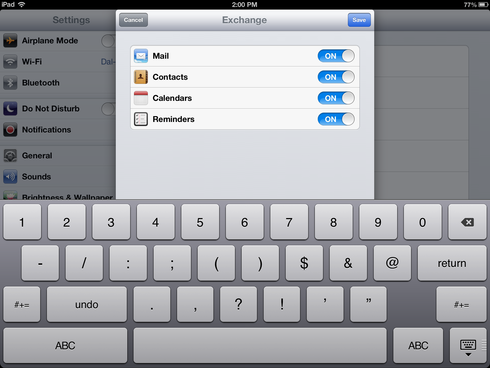
7. Select which other applications to synchronize information between.

8. Select Save.
How do I import and export contacts in Outlook 2011?
Itтs important to note that before deleting your old account, if you wish to transfer your existing contact list you must export the contacts from your existing account and import them into your new account.
Ь§
The following instructions are found on
Ь§
To import, do the following.
1. Under File, select Import.
2. Select the Contacts or messages from a text file
3. Select Import contacts from a tab- or comma-delimited text file.
4. Locate the .csv file, click Import.
5. Map the old field names that were not automatically mapped. Select Import
6. Select Finish.
To export, do the following.
1. Under File, select Export.
2. Select the items to export.
3. Select the right arrow.
4. Choose No, do not delete items. Select the right arrow.
5. Select the name and location to save. Select Save.
6. Select Done.
Recent News
- In Memoriam т Colin Spinney
- Document delivery during Canada Post strike
- New surplus items added in Halifax
- Dal Tigers birthday parties
- Celebrate culture, creativity, and sustainability at the IEW Fashion Show!
- Student Accessibility Closure Friday, November 22
- Where suppliers can meet Dal Procurement
- LSC power outage Saturday, November 23
